플러터는 setState를 사용해서 주로 UI를 업데이트 합니다.
하지만 setState를 할 때 어떤 일이 발생하는지 알고계신가요?
오늘은 setState를 클릭했을 때 어떤 일이 발생하고
플러터를 사용하여 앱을 만들 때 어떤 방법을 사용하여 UI를 최적화할 수 있는지 알아보겠습니다.
플러터로 UI를 업데이트 하는 간단한 예시 만들기
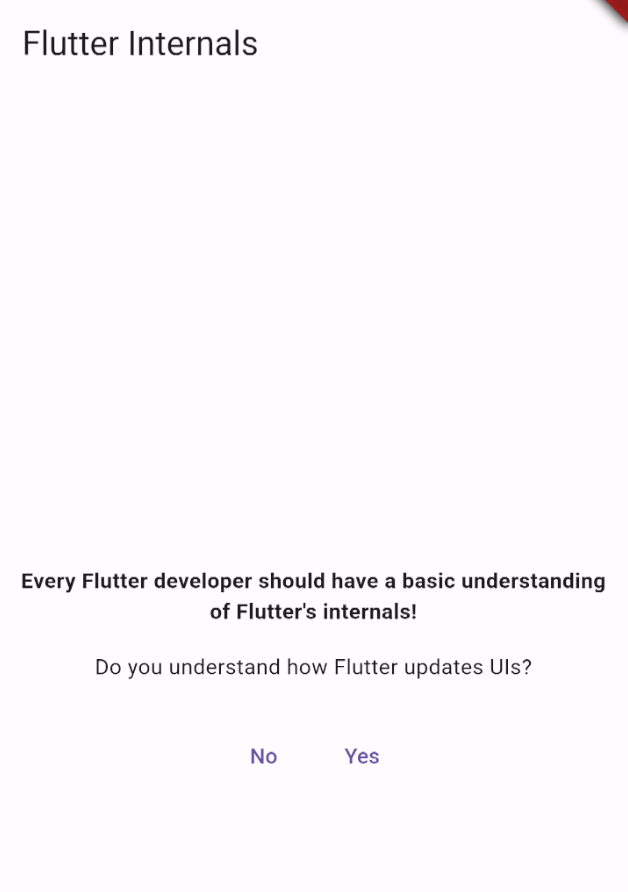
먼저 아래와 같은 간단한 앱을 만듭니다.

Yes를 클릭하면 다음과 같이 바로 아랫 부분에 "Awesome!"이라는 텍스트가 나오는 간단한 앱입니다.

해당 앱을 만들 때 반드시 아래 내용을 포함시켜줘야합니다.
- StatefulWidget으로 만든다
- createElement(), build() 함수에 print() 함수 등을 사용해서 호출될 때마다 로그가 출력되게한다.
저는 아래와 같이 앱을 만들었습니다.
import 'package:flutter/material.dart';

class UIUpdatesDemo extends StatefulWidget {
  const UIUpdatesDemo({super.key});

  @override
  StatefulElement createElement() {
    print('UIUpdatesDemo CREATEELEMENT called');
    return super.createElement();
  }

  @override
  State<UIUpdatesDemo> createState() {
    return _UIUpdatesDemo();
  }
}

class _UIUpdatesDemo extends State<UIUpdatesDemo> {
  var _isUnderstood = false;

  @override
  Widget build(BuildContext context) {
    // setState()가 실시될 때마다 build() 호출
    print('UIUpdatesDemo BUILD called');
    return Padding(
      padding: const EdgeInsets.all(8.0),
      child: Center(
        child: Column(
          mainAxisSize: MainAxisSize.min,
          crossAxisAlignment: CrossAxisAlignment.center,
          children: [
            const Text(
              'Every Flutter developer should have a basic understanding of Flutter\'s internals!',
              textAlign: TextAlign.center,
              style: TextStyle(fontWeight: FontWeight.bold),
            ),
            const SizedBox(height: 16),
            const Text(
              'Do you understand how Flutter updates UIs?',
              textAlign: TextAlign.center,
            ),
            const SizedBox(height: 24),
            Row(
              mainAxisAlignment: MainAxisAlignment.center,
              children: [
                TextButton(
                  onPressed: () {
                    setState(() {
                      _isUnderstood = false;
                    });
                  },
                  child: const Text('No'),
                ),
                TextButton(
                  onPressed: () {
                    setState(() {
                      _isUnderstood = true;
                    });
                  },
                  child: const Text('Yes'),
                ),
              ],
            ),
            if (_isUnderstood) const Text('Awesome!'),
          ],
        ),
      ),
    );
  }
}
그리고 이 앱을 사용해서 로그를 출력하게하면 다음과 같은 결과를 보여줍니다.
최초 앱 실행 시

Awesome 텍스트가 없을 때 Yes 버튼을 눌렀을 때

Awesome 텍스트가 있을 때 Yes 버튼을 눌렀을 때

위 테스트로 한 가지 사실을 알 수 있게 되었습니다.
setState()를 사용하면 반드시 해당 setState() 함수가 들어있는 build()를 호출한다.
그렇다면 다음과 같은 방법으로 최적화를 할 수 있다고 생각합니다.
가능한한 setState() 호출 횟수를 줄이거나 재호출되는 build() 함수의 영역을 줄이면 되지 않을까?
플러터는 Widget을 어떻게 생성하는건가?
그럼 이렇게 생각할 수 있습니다.
플러터는 build() 함수가 호출될 때마다 매번 Widget을 생성하는건가?
답은
그렇지 않다.
입니다.
플러터는 자동으로 똑같은 Widget에 대해선 재생성하지 않고 재활용합니다.
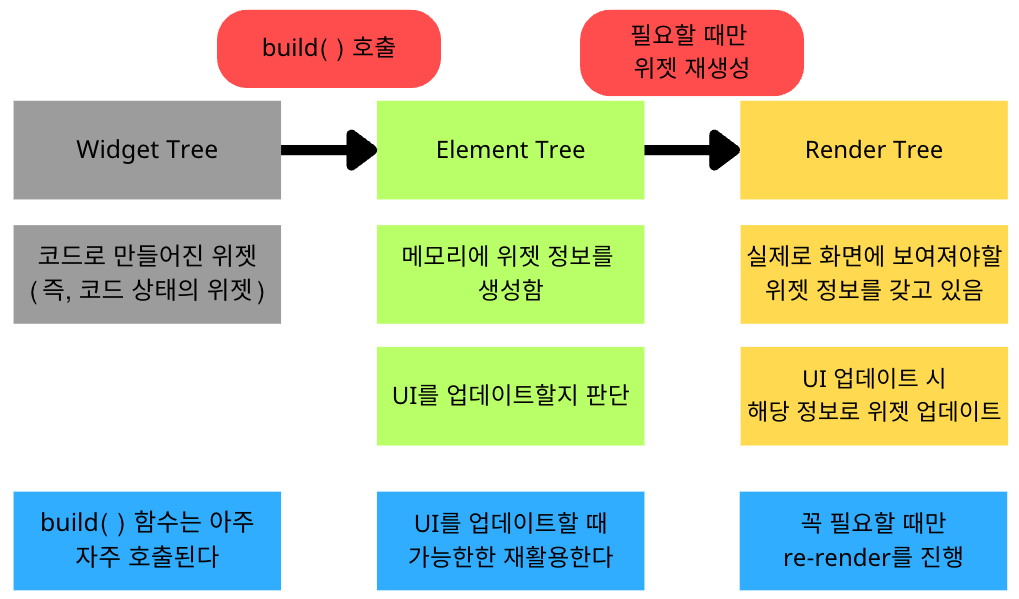
플러터는 다음과 같은 UI Tree를 갖고 있습니다.

위에선 언급한 "재활용"이란
build() 함수 호출 시 플러터가 build() 함수 안에 있는 Widget 들을 re-Render 해야할 필요가 있는지
확인해야한다는 의미입니다.
그렇기 때문에 실제로 re-Render 하지 않더라도 build() 함수가 호출될 때마다
모든 Widget을 확인해야하는 리소스가 발생합니다.
그렇기 때문에 필요한 부분만 확인하도록 하는 것이 중요합니다.
플러터에서 UI 업데이트 최적화 하기
다음과 같이 UI가 업데이트 되는 부분만 따로 떼어냅니다.
(물론 떼어내더라도 똑같이 build() 함수 호출 시 로그를 출력하게 만듭니다)
import 'package:flutter/material.dart';
import 'package:flutter_architecture/examples/trees/ui_button_demo.dart';

class UIUpdatesDemo extends StatelessWidget {
  const UIUpdatesDemo({super.key});

  @override
  StatelessElement createElement() {
    print('UIUpdatesDemo CREATEELEMENT called');
    return super.createElement();
  }

  @override
  Widget build(BuildContext context) {
    // setState()가 실시될 때마다 build() 호출
    print('UIUpdatesDemo BUILD called');
    return const Padding(
      padding: EdgeInsets.all(8.0),
      child: Center(
        child: Column(
          mainAxisSize: MainAxisSize.min,
          crossAxisAlignment: CrossAxisAlignment.center,
          children: [
            Text(
              'Every Flutter developer should have a basic understanding of Flutter\'s internals!',
              textAlign: TextAlign.center,
              style: TextStyle(fontWeight: FontWeight.bold),
            ),
            SizedBox(height: 16),
            Text(
              'Do you understand how Flutter updates UIs?',
              textAlign: TextAlign.center,
            ),
            SizedBox(height: 24),
            DemoButtons()
          ],
        ),
      ),
    );
  }
}
그리고 제일 중요한
나머지 UI 업데이트가 필요하지 않은 부분은 StatelessWidget으로 변경합니다.
import 'package:flutter/material.dart';
import 'package:flutter_architecture/examples/trees/ui_button_demo.dart';

class UIUpdatesDemo extends StatelessWidget {
  const UIUpdatesDemo({super.key});

  @override
  StatelessElement createElement() {
    print('UIUpdatesDemo CREATEELEMENT called');
    return super.createElement();
  }

  @override
  Widget build(BuildContext context) {
    // setState()가 실시될 때마다 build() 호출
    print('UIUpdatesDemo BUILD called');
    return const Padding(
      padding: EdgeInsets.all(8.0),
      child: Center(
        child: Column(
          mainAxisSize: MainAxisSize.min,
          crossAxisAlignment: CrossAxisAlignment.center,
          children: [
            Text(
              'Every Flutter developer should have a basic understanding of Flutter\'s internals!',
              textAlign: TextAlign.center,
              style: TextStyle(fontWeight: FontWeight.bold),
            ),
            SizedBox(height: 16),
            Text(
              'Do you understand how Flutter updates UIs?',
              textAlign: TextAlign.center,
            ),
            SizedBox(height: 24),
            DemoButtons()
          ],
        ),
      ),
    );
  }
}
위와 같이 바꾸고 앱을 실행해보면 겉모습과 동작은 변함없습니다.
하지만, 로그를 살펴보면
앱을 최초로 실행했을 때

Awesome 텍스트가 없을 때 Yes 버튼을 눌렀을 때

Awesome 텍스트가 있을 때 Yes 버튼을 눌렀을 때

위와 같이 UI 업데이트가 필요한 부분만 따로 떼서 StatefulWidget으로 만드는 것만으로
UI 업데이트가 필요하지 않은 부분은
UI 업데이트가 필요한지 확인하는 작업을 생략할 수 있습니다.
결론
위 예시처럼 간단한 앱이라면 사실 성능상 큰 차이가 없습니다.
하지만, 복잡한 Widget 트리를 가진 앱이라면
매번 setState()를 사용해서 앱 UI를 업데이트를 할 때마다
상당한 리소스를 필요로 할 수 있습니다.
그렇기 때문에 개발자들은 적절히 statefulWidget과 statelessWidget를 병용해서 사용해야합니다.
플러터(Flutter)에서 Widget UI에 있는 Key란 무엇인가?
플러터의 메인 레이아웃이라고 할 수 있는 StatelessWidget, StatefulWidget을 보면 다음과 같은 키(Key)가 존재합니다. 해당 Key의 의미는 뭐고 왜 존재하는걸까요? Key의 역할 확인을 위한 예시 프로젝트
android-developer.tistory.com
'플러터(flutter)' 카테고리의 다른 글
| 플러터의 Riverpod 사용 방법 기초부터 자세히 설명 - 1 (4) | 2023.12.06 |
|---|---|
| 플러터(Flutter)에서 Widget UI에 있는 Key란 무엇인가? (2) | 2023.09.25 |
| flutter에서 화면 회전 하지 못하게 막는 방법 (0) | 2023.08.29 |
| flutter_dotenv을 사용해서 local에 API Key 보관하기 (0) | 2023.08.11 |
| 플러터에서 androidManifest에 localProperties 값 대입하기 (2) | 2023.08.08 |
"이 포스팅은 쿠팡 파트너스 활동의 일환으로, 이에 따른 일정액의 수수료를 제공받습니다."


댓글